Cupcakes and Friends


Last Sunday my daughter had a small get together at home with friends to make cupcakes. I loved that they used a recipe from this blog to make their own cupcakes from start to finish. What I did not like was that I was not the one baking the cupcakes, but I did take advantage of this opportunity and prepared a few treats to surprise them:). At the end of this month they are graduating from high school, so this will be a good memory for Ruby from a few of her friends.


I want to congratulate them on their victory in preparing the chocolate cupcakes with Nutella and Italian meringue. The cupcake tasted DELICIOUS! I loved watching them decorating the cupcakes making rosettes and swirls. Great job guys!


Ruby, Christine, Noheli, Marlen, Estephany, Kelsie, y Paola.

The only boy that was present was Francisco, and he had a chance to "really" enjoy the cupcakes!


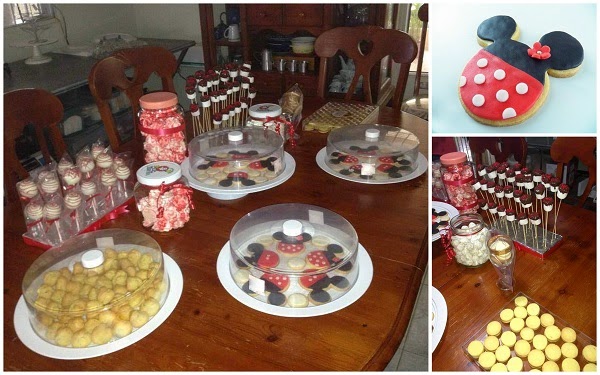
The following are cake pops, marshmallow pops, alfajores,  Minnie and Mikey fondant covered cookies, Mexican wedding cookies (polvorones), Dominican meringue cookies (suspiritos) and profiteroles filled with a chicken spread, were all done my me. For the delicious chicken filling recipe go here. At the end it all came together like I had planned it with anticipation, but I am not an expert in this of party tables. Pinterest is of great inspiration for me and I am planning on organizing many tables like this or better for my family when they come to visit me from USA.

I do have a problem with leaving everything out in the open for a long time, so I manage to cover  a few things with treat bags and jar tops. I always wonder how cold and warm desserts are kept at their required temperature without spoiling while they are on display in dessert tables in most cases many hours? Do you have any tips or ideas for party tables?


A few ideas...

I have a weakness for saving jars and bottles to recycle them.  I used maraschino cherries to display the meringues and the polvorones.


As cake pops and marshmallow  pops stand I used foam pieces covered in aluminum and decorated the border with red ribbon. Color paper or gift wrapping paper make wonderful covers as well!


Have a sweet day!


Flee the evil desires of youth and pursue righteousness, faith, love and peace, along with those who call on the Lord out of a pure heart.~ 2 Timothy 2:22.

White Cake Recipe


I have a fondness for the color white when it comes to adorning cakes and cookies, yet today's cake surprises me with its white interior. Light hues have always held a special place in my heart, particularly white, pink, and light blue. Occasionally, I deviate from these tones to infuse variety and uplift my spirits—like the time I opted for brick-colored kitchen tiles with a cream backsplash. 


Reflecting on that decision eight years later, I find myself pondering what led me to choose such a color scheme. Now, I daydream about renovating my kitchen, and unsurprisingly, the color scheme I lean towards is white! My Pinterest board brims with inspirations for my future kitchen; feel free to visit and pin your favorites.

Shifting gears to the recipe... This white cake recipe is my go-to for creating vividly colored cakes without the yellowish tint that butter and egg yolks often impart. It served as the foundation for my Dominican flag cake. While a white cake mix could suffice, when aiming for a white, light, fluffy, creamy vanilla cake with a subtle hint of almond, nothing beats the homemade recipe I'm about to share. It's a gem for your culinary repertoire. Initially planning to frost the cake in white, I eventually blended in a touch of pink to complement the chocolate roses. Indulge in this delightful creation.


The texture of this cake is fluffy and moist. For the filling, I used vanilla buttercream with a little strawberry puree, and the frosting is Italian meringue. You can find both frosting recipes in this blog.


What is your favorite cake recipe? Do you have a favorite white cake recipe?


White Cake 

This simple recipe for moist, fluffy white cake is incredibly easy to prepare.

½ cup shortening or ¼ cup unsalted butter (see notes)
1 cup granulated sugar
1 teaspoon clear vanilla
2 teaspoon almond extract (or more)
2 cups sifted all-purpose flour minus 1 Tablespoon
1 Tablespoon baking powder
1 Tablespoon of cornstarch
Pinch of salt
½ cup + 2 Tablespoons milk (135 ml)
4 egg whites

Instructions: 
1. Measure all ingredients accurately. Lightly grease pans and line the bottom with parchment paper. Preheat oven to 350˚F (175˚C).
2. With the attachment paddle beat the shorting and sugar until light and fluffy, about 3 minutes.
3. Add the extracts and beat for a minute. Add the flour mixture alternating with the milk, beginning and ending with flour. Stir until just combined.
4. In another bowl beat the egg whites until foamy and fold into the flour and shortening mixture in two parts.
5. Divide the batter into pans. Bake for 20-30 minutes, or until a toothpick inserted into the center comes out clean.
6. Cool on wire racks until slightly cooled, flip the cake to a serving plate. Cool completely before frosting.

Yield: Two layer 9” (23 cm) cake.


Notes: 
a) When it comes to the butter measurement, I typically use 1/4 cup in this recipe to avoid the cakes turning out too greasy with the butter available in my area. However, if you do not face the same issue, feel free to use 1/2 cup of butter. Personally, I opt for shortening when making this cake.

b) I recommend using shorting for a whiter color cake. 

c) Vibrant and precise color sponge cake: To achieve an exact and vibrant color without the yellow tone that butter and egg yolks provide, follow this recipe to the letter and add the gel food coloring at the end. If you want to create multiple colors, divide the batter into different containers and add the colors of your choice according to your preference.


"Therefore, if any man is in Christ, he is a new creation. Old things have passed away; look, new things have come!"  ~ 2 Corinthians 5:17.


How to Make Modeling Clay with Chocolate Candy Melts


If you enjoy making fondant flowers and decorations, then working with chocolate modeling clay is a true delight. The edible flowers created with this clay are not only enticing but also luscious, making them a must-have for any dessert. With only two ingredients needed, this chocolate clay is simple to make and can be done in no time at all.


The weather in my area hasn't been ideal for working with modeling chocolate, which is why I haven't shared any of my creations until now. However, I have found that candy melts are more resistant to heat, so I have been using them to make cake pops. Recently, I decided to try my hand at making chocolate roses. While they may not be perfect, as they are my first attempt, I plan to use them on a cake I am making for my daughters.

Have you ever worked with candy clay before? What types of decorations do you typically create with candy melts? Share your experiences and creations with us!


Chocolate Modeling Clay 

Ingredients: 
14 ounces candy melts (397 g)
cup of corn syrup (79 ml)

Instructions: 
Melt chocolate in microwave or bain marie following package instructions and be careful not to overheat. Stir the chocolate until it's completely melted and once it has cooled to room temperature (cool to the touch) add the corn syrup.

With a spatula gently stir scraping the sides of the bowl until the corn syrup has fully incorporated and blended with all the chocolate. It takes about a minute, and the mixture should look like a ball of cookie dough. Be careful not to over mix or you will damage the mixture and the chocolate will break up into pieces. Pour the mixture onto a plastic sheet and spread a little and wrap. Leave to set overnight at room temperature.

The next day your chocolate clay will be ready for you to mold into any shape or decoration your heart dictates. Enjoy!!

Notes: To color chocolate clay add drops a knead in after the clay has set. Only use candy colors or powder candy colors since they are oil-based and won't cease the modeling clay. I use an oil-based candy color.  A little color can be added to the chocolate at the time of adding the corn syrup and no further mixing is required; however, if a lot of color is going to be used to make a very bright or dark color, then the amount of corn syrup must be adjusted since less of it will be needed to compensate the color amount used.


Cool References:
Melting chocolate tips
How to make a chocolate rose
Introduction to moldeling clay
Lauren Sulser wonderful video below:


Lauren has made a wonderful video with the steps, except that the measurements are different and she uses gourmet chips (pure chocolate). The measurements she used are 1 pound of chocolate (454 g) and ½ cup of light corn syrup (118 ml).


“Flowers wilt, jewelry tarnishes, and candles burn out...but chocolate doesn't hang around long ehough to get old.” ― Sr. Cocoa Loca