Showing posts with label Appetizers and Fritters. Show all posts

Meatless bulgur balls (Bolitas kipes)


En Español

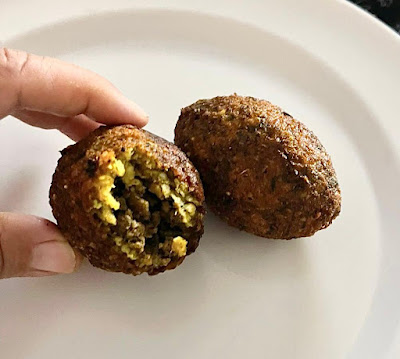
One of the typical Dominican fritters and my favorite above all are the Kipes. The quipes or kipes are usually prepared with ground beef mixed in the bulgur wheat dough and as the filling. Last Saturday night I had cravings for some kipes, but had no ground beef, and since it was late night, I could not go to buy some either. I came up with the idea to prepare them without any meat to see if the dough would form and fry well. The results were as you see it, terrific! The taste is very similar and delicious, but I admit that for us meat lovers, with beef it is better.

These make a perfect finger food especially when served with mayo ketchup dipping sauce. For someone who does not like meat or is on a meatless diet, these would be a great party snack to serve them. At home we liked this new version very much, and like always I wanted to share it with you. Please leave a comment and let me know if you have tried the traditional kipes or if you prepare this meatless version. I did not use a filling, but you can fill the center with cheese, beef, chicken or seafood. I do have a step by step bulgur fritters here: Kipes.


Ripe Plantains Canoes

maduros relleno

No, I'm not referring to a boat used for river trips. I'm talking about delicious "canoes" made with ripe sweet plantains (plátanos maduros), an appetizer enjoyed in many countries across Central America and the Caribbean. A few days ago, I mentioned to my husband that I was craving "canoas de plátanos maduros," and yesterday, he surprised me with the ingredients, declaring that he would prepare this dish for me. Given that my husband rarely cooks, I was not only delighted to have a break from cooking but also felt compelled to preserve this recipe as a cherished memory on my blog. 


Personal blogs serve as repositories for a multitude of recipes and stories. As I peruse my collection of recipes, I'm reminded of countless special occasions filled with fond memories of family, friends, and the joy of cooking. This blog is my sanctuary for favorite recipes intertwined with treasured family memories.

Returning to the recipe... this dish evokes memories of my Puerto Rican friends who prepare these canoes, as well as a cuchifrito restaurant in the Lower East Side New York where I always indulged in these canoes filled with ground pork meat. I haven't come across these being sold anywhere in this country, which is why we prepare them at home. If you typically purchase these canoes, I encourage you to consider making them yourself next time; they'll taste even better and be less greasy. I hope you enjoy my husband's rendition of this recipe.

ripe plantain canoes

Batatas Fritas, Fried Boniato


From January 26 to February 27 Dominican Republic celebrates its patriotic month by commemorating our Founding Fathers and the symbols that identify us as Dominican in the world. It's a month to celebrate our independence and to remember, learn and keep us from repeating the mistakes of the past. Unfortunately it may seem we need Juan Pablo Duarte, Matias Ramon Mella and Francisco del Rosario Sanchez to come back and liberate us from the slavery of certain celebrations that I believe should have nothing to do with our folklore and a few other things which I prefer not to write about for now.

I do appreciate the immense heart of this country that automatically grants Dominican citizenship to those born abroad if your parents are Dominicans. So for a few years now I’ve officially been an American Dominican with cédula and all! At times I feel I do not fit in with must customs here, but while I am here in what I can I hope to help make it a better place.


On another note, there is so much to celebrate in this country: an almost always perfect weather, beautiful coastlines, enchanting forests, beautiful green mountains and the secluded rivers in the mountains that are fascinating. To all Dominicans, celebrate this country by bringing out the best of you and of course with our food and delicious desserts. If you are interested in learning how to cook Domnican food I recommend you my eBook.

Today I’ve cooked something easy, sweet potato or boniato fries that are as popular as the tostones, both are favored side dish fritters for Dominicans. In frying stalls and restaurants these batatas fritas are served as an accompaniment to fried meats, sausages or fish. I love them, and lately I have been preparing them often because I find they are less greasy than fries. Since it's batata season, this tuber can be found everywhere in the local markets at a very comfortable price, only five pesos a pound (about .13 USD cents a pound). So take advantage and prepare these sweet potato fries or any of the recipes with this ingredient that I have shared in this blog. Look for  the links of those recipes below. 


Yuca Fritters, AREPITAS de YUCA


Due to our farm’s cassava harvest in the past month, I've been enjoying many yuca recipes.  Cassava is also called yuca or manioc. Today I will start with a simple and delicious recipe, Yuca fritters (arepitas de yuca). Yuca fritters, like tostones, are common side dishes in Dominican cuisine. I love these so much, I even eat them cold. With stewed beef, baked chicken, rice and beans or simple alone, these are tasty fritters. There are several ways to make them changing an ingredient here and another there, but always with the same results, delicious fried yuca!


Our Yuca plantation six months ago. 

Yuca tree ready to harvest.

Cassava / yuca leaf. 
Yuca from our farm. Yuca can be grated or cut in three to four inch chunks, to be eaten, fried or boiled.


Arepitas de Yuca
(My Mom’s recipe)

Ingredients:
2 pounds of cassava
2 eggs
2 teaspoons salt
2 Tablespoons of milk
½ teaspoon of garlic mashed
1 Tablespoon sugar
1 teaspoon of anise (optional)

Preparation:
1. Peel and a grate the cassava. Once all cassava is grated squeeze out any starch water, and mix with all the other ingredients.

2. With the help of a Tablespoon form oval shaped fritters, try not to make them too thick and slide into hot oil. Fry  4-6 arepitas at a time until golden brown on both sides. Serve hot.

Yield: 45 arepitas


Notes: 

a) This recipe can be divided in half if you prefer to do less arepitas

b) You can prepare this the night before and store it in a zip lock or covered container in the refrigerator and fry the next day. 

c) Any leftover fried arepitas can be stored in the refrigerator and heated in the microwave the next day.


Bon Appetit!


You can also find Arepitas deYuca in the following kitchen:


Trust in the LORD and do good;dwell in the land and enjoy safe pasture. Take delight in the LORD, and he will give you the desires of your heart. ~ Psalm 37:3-4


CoverHowtocookDominicanStylebyMariNunezkdp
eBook by Mari available on Amazon.

Fried Green Plantains, TOSTONES


TOSTONES are FRIED GREEN PLANTAINS, the preferred side dish in many Latin American kitchens. This is how I most like to eat the plantains. They can be served at breakfast, lunch, or dinner. It is a very popular fritter served with the "comida" at noon and for dinner. 

Strangely enough, it is also sold for breakfast with fried salami or even fried chicken in the popular business called "cafeterias". I know you may be wondering, fried chicken and plantains for breakfast? Some Dominicans love this, but only if there is no mangú - mashed boiled green plantains. 

About MANGU, I will write another day because I believe a separate post would be more appropriate since it is one of the dishes that represent Dominican cuisine, just like the MOFONGO is to Puerto Ricans. These recipes are cooked and very much loved in BOTH countries.

En Español: AQUÍ


Although it is simple to make, I must confess that when I got married, I did not know how to cook tostones. If you don't know the correct steps, your results can be a total failure. They can come out very hard, too greasy, or even raw. All of these mentioned happened to me. Therefore, if my advice helps you achieve great, crispy, and well-done fried plantains, then I'll be very happy and could go BAKE in peace.

To my sweet little ones at home and the apprentices who follow this blog, you will no longer have excuses for not knowing how to make these. The steps are VERY EASY; the most difficult part is to peel the plantain, but I still guarantee you could make these... it is a piece of cake, TRUST ME!!


Many people add water with garlic, but I don't because I find this makes them soggy. At home we like them to be a little crispy not oily. My daughters love them with ketchup, and I am almost sure that in many of your homes is the same.


Tostones, Fried Greens Plantains or Patacones
The preferred side dish in many Latin American kitchens.

Ingredients:
Green Plantains (one plantain yields 5-6 tostones)
enough oil for deep frying
salt

Instructions:  

1. Peel and cut the plantains into one-inch slices, which can be diagonal or straight.

2. First Fry: Fry the pieces in a frying pan with enough oil to cover the one-inch chunks, about 1½ -2 inches deep. The oil must be hot (350˚F); otherwise, the tostones may come out greasy. Fry until they start to turn golden in color. Drain them in a mesh basket or on a paper towel.

3. After a minute or two, not more, flatten the pieces with a tostonera. If you don't have one at hand, a wide cup or plate will do, but I do recommend getting a plantain press (tostonera).

4. Second Fry: (To be done right before serving because they will harden as they cool) Return the flattened plantains to the hot oil until they reach a golden color and are fully cooked. Remove them from the oil and drain. Sprinkle with salt and serve immediately. To enhance the taste, you can use garlic salt instead of regular salt or sprinkle them with garlic powder and salt.

Yield: 4-6 servings.

Speaking of patacones, here is an old-time video of, Johnny Ventura, one of the best merengue artist, Enjoy!


I take this opportunity to give you a peek of our banana plantation, this is what surrounds my entire house. The yellow- greenish tree trunks are the bananas (the ones we eat raw as dessert) and the ones with reddish trunks are the plantains (the cooking ones).


If you are interested in purchasing one of these aluminum tostoneras go HERE.


Salvation is found in no one else, for there is no other name given under heaven by which we must be saved. - Acts 4:12
Text and Photos © Mari's Cakes 

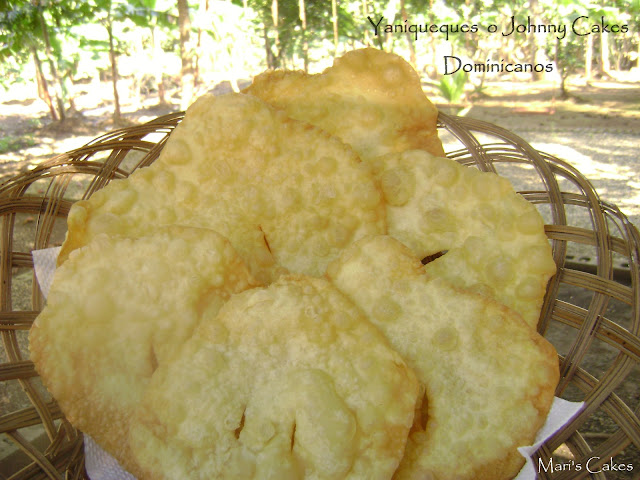
Dominican Johnny Cakes or Yaniqueque


The Johnny Cake, known as Yaniqueque in the Dominican Republic, is a variation of the North American Johnny Cake. While the original recipe is made with cornmeal, there are versions that combine cornmeal and wheat flour, as well as others that use only wheat flour. Some variations include additional ingredients such as shredded coconut, coconut milk, egg, honey, sugar, and salt, among others. The preparation method can be either baked or fried.


In the Dominican Republic, Yaniqueque was introduced by English-speaking Caribbeans or African descendants, who adopted it as one of their favorite dishes due to its simple preparation and low cost. The Dominican version is made by mixing wheat flour with butter, oil, and a touch of salt. Although it is generally fried, it is sometimes baked. Discover more about this delicious variant of the Johnny Cake and savor its unique flavor.


This recipe is a favorite among Dominicans and has become a craving for those living outside the country who have tried it during their vacations. Personally, it brings back memories of my trips to the Dominican Republic, especially visits to Boca Chica beach, where you can find Yaniqueques and fried fish. Although they are now sold at many roadside stalls, I insist that there is no comparison to the ones we make at home.

The recipe I share is the same one I use for empanadas and pastelitos, but it is halved as it yields enough for Johnny Cakes. Note that for pastelitos, I don't use baking powder. I hope you enjoy my version at home, bringing a piece of the authentic Dominican experience. Happy cooking!


Yaniqueques dominicanos


Dominican Johnny Cakes, Yaniqueques

Ingredients:
2 cups flour (260 g)
1 tablespoon sugar 
¼ teaspoon salt
1 teaspoon baking powder 
¼ cup margarine (56 g)
1 egg
½ tablespoon cooking wine (8 ml)
¼ cup + 1 tbsp water (74 ml)
Oil for frying  


Instructions:
1. In a bowl, mix together the flour, salt, sugar, and baking powder. Make a hole in the center of the dry ingredients.

2. Add the margarine, egg, and cooking wine to the center of the dry ingredients. Mix everything together with your hands until well blended.

3. Gradually add the water to the mixture, a little at a time, until a soft dough forms. You may not need to use all of the water. Knead the dough lightly and let it stand for at least half an hour.

4. Divide the dough into small balls, each about 1 ½ inches wide. Roll out each ball with a rolling pin on a floured surface or between sheets of waxed paper until a thin disk is formed. Use a knife to make two slits in the middle of each disk to prevent the dough from inflating while cooking.

5. Fry the disks in hot oil, turning once, until both sides are golden brown. Drain the fried disks on paper towels. If desired, sprinkle with salt, but it is not necessary.


Notes:
a) The thinner you roll out the dough, the crispier it will be. If you leave it a bit thicker, it will be soft on the inside and toasted on the outside.

b) It can be served with ketchup.

c) My favorite way to eat it is giving it an American twist, sprinkling it with powdered sugar and cinnamon – they taste delicious! This way, it reminds me of the "Fry Dough" at Canobie Lake Park in New Hampshire, although I clarify that Dominicans don't eat it this way.


If you enjoyed this recipe, you'll love:


Again, truly I tell you that if two of you on earth agree about anything they ask for, it will be done for them by my Father in heaven. - Matthew 18:19

Hamburger for a King!


My favorite food is hamburger, and I could eat it every day. I saw the following recipe in a television program called, Cocina Gourmet, led by my favorite chef, Eugenia Rojo. Since then, this has been our favorite homemade burger recipe. The meat is juicy and tasty, I recommend it 100% because it’s truly delicious. 


In D.R. Father’s Day is celebrated in July, therefore, being this my first Father’s Day recipe as a blogger, I would like to dedicate this recipe to the memory of my father, Marino Núñez, who was the first to teach me how to make homemade New York Hilton style hamburgers, for being the best father in the world to me and because he was such a  good hearted person. May God have him in his glory. 


Ingredients:
The preparation of the beef patties: 2 lbs. ground beef meat, 1 medium onion cut into small cubes, 2 red peppers, roasted and chopped, 2 half spoons BBQ sauce, 2 tbsp Worchestire, 2 tablespoons of ketchup, 1 teaspoon black pepper, 1/2 teaspoon of oregano, 1/2 teaspoon salt , 2 cups of oatmeal, 2 eggs.
 
To assemble the Burger: Buns, cheese (Danish) bacon, lettuce , tomatoes, 1 onion cut in rings. Ketchup and mayonaise. You could use the MayoKetchup sauce, it goes well with this burger.

Preparation: mix all ingredients for the preparation of the beef patties, and shape into burger patties. In a skillet with a little oil, Cook to taste. 

 
I prefer the following order from the bottom – up between breads: ketchup, pickles, onion, meat, cheese, lettuce, tomato and mayonnaise. Lol, I begin to sound like sponge Bob! However way you please to assemble your burger is OK…. Enjoy!!!!


“….and the dust returns to the ground it came from, and the spirit returns to God who gave it” - Ecclesiastes 12:7-9


Onion Rings (English)

onion4


On the weekends we spent it together in family and we tend to cook snacks that our girls love. This weekend my daughters Crystal prepared some onion rings, and they were delicious. My other daughter Ruby made a sauce to go with it. Today I share these recipes with you. Enjoy!

Onion Rings Recipe

Ingredients:
2-3 large onions
1 cup flour
¾ teaspoon salt
Pepper
1 teaspoon of dried parsley or 1 tablespoon of fresh parsley (optional)
1 teaspoon baking powder
2 eggs, well beaten
1 cup of milk
cooking oil for deep frying


onion 2 Preparation:
Wash and peel onions, cut into 1/4-inch thick rounds. Separate rounds into rings. In a bowl, combine flour, seasonings, and baking powder. In a measuring cup, whisk together egg and milk. Add milk mixture to dry ingredients, blending well. Dip onion rings into batter, and then drip into deep fat at about 365°. Fry until golden brown, turning to brown both sides. Remove to paper towels or brown paper bag to drain thoroughly. Sprinkle with a little salt before serving. Fried onion rings recipe serves 6
to 8.

Click for Mayonnaise and Ketchup Sauce recipe.
 
 
Onion 1


"Therefore, get rid of all moral filth and the evil that is so prevalent and humbly accept the word planted in you, which can save you." James 1:21 
  for cc flyer (3)
Thank you Crystal for this recipe, the onion rings were delicious and the touch of parsley made them even more special!


Kipes

kipes, kibbeh, quipe


Easy and Delicious Mari's Kipes!

Kibbeh or Kipes, popularly known as Quipes, represents an exquisite Dominican street food delight. This delicious preparation consists of a charming blend of seasoned ground meat, carefully wrapped in a crispy and golden shell made of hydrated wheat. Our detailed step-by-step guide will accompany you throughout the entire process of crafting these delightful creations, ensuring that each bite provides an authentic experience of the distinctive flavor of Dominican kipes.


Kipe, Quipe, Kibbeh, or Kibbe, regardless of the name you use, this appetizer is highly beloved in the Dominican Republic, holding a prominent place in local festivities, special events, cafeterias, and the vibrant streets of Dominican street food. With deep roots in Arab cuisine, particularly in Lebanon, this dish has been affectionately adopted by Dominican culture and is now known as Dominican kipe.

Embarking on a personal journey to learn how to make Kipe has been an exciting adventure for me, and I am thrilled to have mastered the art of its preparation several years ago. If you are interested in preparing this delicious appetizer, look no further, as this recipe and step-by-step guide on how to make Kipes (Quipes) are perfect for you.


This is how I learned to make kipes, but if you don't have a meat grinder you can still do the kipes buy kneading the meat and bulgur wheat mixture. 


Dominican Kipes Recipe (Quipes)

Recipe and Step-by-Step Guide on how to make Lebanese-style Dominican Kipes at Mari's Cakes.

Ingredients: 
1 pound whole-grain bulgur cracked wheat (2 ⅔ cups = 455 grams)
1 pound of ground beef (+ more for the filling)
1 large onion, chopped
1 teaspoon allspice
1 teaspoon oregano
½ teaspoon black pepper Salt to taste (I use 2 tsp)
¼ cup of fresh peppermint leaves
Tabasco to taste
¼ cup raisins for filling (optional)
Enough oil for frying

Ground Beef Filling: 
½ pound of ground beef
1 clove of garlic
¼ cup onion
¼ cup bell or cubanelle pepper
1 teaspoon tomato paste
Pinch of oregano

Salt to taste

* The highlighted ingredients in yellow can be replaced with 1 Tablespoon of Dominican Sazon.


Preparation:
1. For the filling: Cook ½ pound ground beef with the above ingredients. Leave the meat to cook thoroughly and dry (no sauce) and set aside. I recommend you follow the steps on how I make the picadillo de Res found here

2. Rinse and soak bulgur wheat in water for 1-2 hours. With a strainer squeezing all the water out of the wheat. It is very important to drain well.

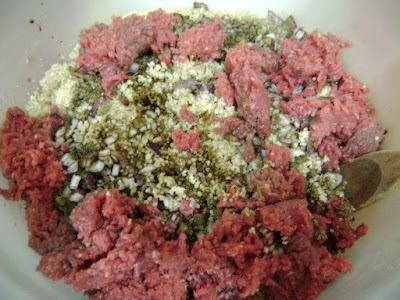
3. Mix hydrated wheat with 1 pound of ground uncooked beef, minced onion, allspice, oregano, black pepper, salt to taste (I use 2 tsp), peppermint leaves, and Tabasco to taste. Combine all these ingredients and process through a meat grinder twice, check for salt. If you don't have a grinding machine, you can mix the hydrated bulgur wheat and the meat by kneading it by hand for a few minutes, until you obtain a compact dough that is easy to shape.

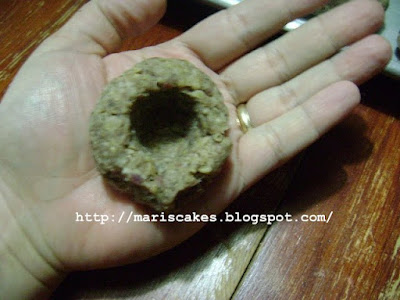
4. To form Kipes: Take about ½ cup or less of wheat mixture. The amount depends on the size you want your kipe to be, the larger you make it the deeper your fryer should be, and the more oil you will need. Form a compact ball, then form and hole in the middle to make room for the tablespoon of meat filling, close in the hole, and form the kibbeh into an oval, round, or spike form at the tips. You can rub your hands with oil or cold water to help keep the dough from sticking to your fingers.

5. The oil should be hot and abundant enough to cover your kipes. Fry them until they are golden brown on both sides and drain in a container with an absorbent paper towel. Note: If the oil is cold, the Kipes will lose their shape and crumble. Serve with ketchup or mayo-ketchup sauce. Enjoy!


Yield: 36 kipes small size (3 "= 7.5), 25 -29 kipes medium size.


Notes: 
My Amazon recommendation is theKibbeh Rolls Maker Mold Manual Press. This Kipes (quipe) press is very helpful as it makes the task faster and neater, producing uniform-size rolls.


If you found this Kipe step-by-step guide helpful, you'll love Mari's:


"This is because I want faithful love, not sacrifice. I want people to know God, not to bring burnt offerings." - Hosea 6:6