Showing posts with label Thanksgiving Menu. Show all posts

Mari's Favorite Recipes: Thanksgiving Menu from Our Kitchen to Your Table

Thanksgiving recipes


Although Thanksgiving is not an observed holiday in the Dominican Republic, it has influenced the country, which recognizes it as a beautiful American custom to celebrate a day of gratitude and enjoy a special dinner with family. It's an ordinary work and school day here, which can make it slightly difficult for Americans who want to continue the tradition. However, many of us still manage to celebrate it and either bake a turkey with all the trimmings or at least a pumpkin pie to mark the occasion.


Living here has taught my family and me the importance of valuing what truly matters - giving thanks together as a family for dinner, regardless of the country, day, or meal on the table. It's also important to remember to pray for those who struggle to get their daily bread.

At home, we enjoy traditional American side dishes with a Latin-flavored baked turkey. Our table must-haves are corn pudding, biscuits, and cornbread dressing, accompanied by fresh vegetables. For dessert, we usually have apple pie, tres leches cake or bread pudding. The following recipes are suggestions for Thanksgiving Day, and for more recipes, you can click on the recipes categories at the right side of this blog. 

I have taken the initiative to pre-bake an assortment of cakes, ensuring a delightful array for you to choose from. Additionally, I've crafted a convenient downloadable e-book titled "Holiday Cakes" – a must-have for anyone passionate about baking. Should you be aware of a fellow baking enthusiast, consider this e-book as the ideal gift. Simply input their email during the ordering process to seamlessly share the joy of baking.

Wishing you a happy and blessed day with your family and friends. Thank you for reading my blog and sharing my recipes. Happy Thanksgiving!


Bake the Perfect Chicken, Turkey or Pernil (Pork Shoulder-Ham)


It's that time of year again when we start planning how to roast the perfect turkey or pernil (ham or pork shoulder) for the upcoming holidays. We're always looking for recipes that will help us achieve delicious, tender, and juicy meat. Today I baked a chicken, but if you're wondering how to prepare the perfect turkey or pork shoulder, the following instructions and links will be helpful.


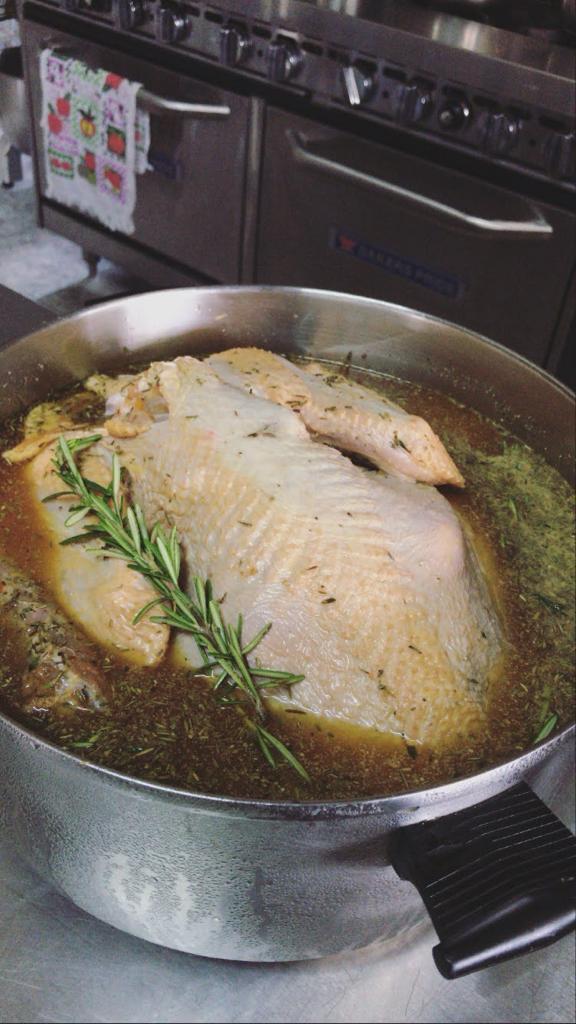
Brining is my favorite and recommended way to roast chicken, turkey, and ham. When meat is brined, it comes out tender and moist on the inside while being crispy and nicely browned on the outside. Every time I bake chicken, I prefer to brine it because the outcome is a great-tasting baked chicken, just like the one you see in the photos. Before I share my favorite baked-brine chicken recipe, I want to provide some information on roasting a turkey and ham because I know you'll need it soon. If you haven't tried brining before the big turkey day, I recommend practicing with a chicken first and making a pre-Thanksgiving dinner. While you're at it, you might want to try my herbed brown gravy recipe it's delicious! 

I recommend you also read Time for Barbecuing and Brine for Turkey and Pernil, where you will find Mari's Brine Recipe.


What is brine and where is the recipe? You can find my brine recipe here with additional helpful information: Mari's Brine.

How long to Brine?:

Whole Chicken (4 to 5 pounds) 5 hours or 1 day - full day recommended.
Turkey Breast (4-5 lbs.) 1 - 2 days
Whole Turkey (12 -14 lbs. 1 - 2 days
Pernil / Ham (10-14 lbs.) 1-2 days

Instructions and Notes: 
a) The meat, in this case turkey or pernil, must be completely submerged in water with salt. A very large pot or kitchen bucket will make a great container.

b) 1/4 cup of salt for every 2.5 liters (10 cups) of water that is needed to cover the meat.

c) My variation on the flavor of brine for Thanksgiving and Christmas is that I add a packet of Sazón Goya with coriander and annatto for every 2 liters of water. I also add more garlic and oregano along with all the other ingredients to make it more Dominican flavor delicious.

d) Before baking remove Chicken, turkey, or pernil from the brine and discard the water. There is no need to add more seasoning. Trust me the bird has absorbed all the flavors and will taste delicious.

e) Bake covered over a rack, and then leave uncovered for the last 30 minutes to brown and crispy on the outside. Cooking time varies depending on the type of oven and temperature you set it to cook. I set mine to 325°F (165 °C) this way it cooks slowly and evenly.


How long to bake a turkey or ham @ 325°F (165 °C) 

Turkey 
Pounds:
8  LBS12  LBS14  LBS18 LBS20  LBS24  LBS
 Time in oven without stuffing  
2 hours 45 minshours
hours 45 mins
h 15 mins
4 hours ½
hours
Time in oven with stuffing
hours 
hours y ½
hours 
hours  ½
hours 45 mins
hours 15 mins

*(1 kilo = 2.2 lbs)

Ham, Pork Shoulder  (Pernil) 
Pounds:
8-10 lbs.12 -14 lbs.16-18 lbs.
20-24 lbs. 
 Time in oven
hours½4-5 hours
5-6 hours
6- 7 
hours


brine


Mix all the herbs and spices together in a pot, follow the mixing instructions, and in goes your bird.  As easy as it sounds and there is no need to get your hands greasy with butter or seasoning, the salt water does it all for you. The sugar and honey in the brine help your meat to brown naturally with an appetizing color.


Bake the Perfect Chicken

You'll Need:
1 chicken (3.5 - 4.5 lbs.)
Mari Brine recipe


Instructions for perfectly baked chicken:
1. The night before baking prepare brine as directed. If you still haven't saved it, get my brine recipe here: Mari Brine.

2. Submerge the thawed chicken in a brine, cover it, and place it in the fridge.

3. On the next day, remove the chicken from the liquid and place it on a baking tray. Preheat the oven to 375°F (190°C) and bake the chicken with the breast side up for 1 hour and 40 minutes. Cover the tips of the thighs with aluminum foil once they turn golden brown to prevent excessive browning. Leave the chicken in the oven until it is golden and fully cooked to your liking. Note: If you are cooking a Pork Shoulder or a Turkey, I recommend baking it covered until the meat is tender; this will save you time and ensure thorough cooking inside. The temperature for both should be 325°F (190°C).

4. Before serving, let the chicken rest on the baking tray for 15-30 minutes to allow the juices to be absorbed. Some people cover it with aluminum foil, but I prefer not to cover it to maintain crispy skin. After the resting time, transfer the chicken or turkey to the serving plate. Enjoy your meal!


Notes:
a) In step #3: When preparing a Pernil (Pork Shoulder or thigh) or turkey, I suggest baking it covered until the meat becomes tender. This not only saves time but also ensures thorough cooking on the inside. Maintain a temperature of 325°F (190°C), and the tenderizing process may span 3-6 hours, contingent on its size. To assess tenderness, simply poke the meat with a fork; if it easily penetrates in and out, it's tender enough to uncover. Proceed to bake uncovered until achieving the desired browning.

b) If you're not using a rack to elevate the chicken, it won't brown underneath. What I recommend is as follows: bake it with the breast side up for 50 minutes, flip the breast side down and bake for 20 minutes or until it browns, and finally, turn it back with the breast side up and bake for another 15 to 30 minutes or until it is fully cooked to your liking. The cooking time varies depending on the chicken's size; refer to Better Homes and Gardens: How long to cook my chicken? Better Homes and Gardens for delicious results: How long to cook chicken.


By the way, don't forget to grab a copy of my E-book Holiday Cakes for yourself and as a gift for a friend. I've included some amazing cake recipes that are sure to delight your family during the holidays. 


Happy baking!

Delicious Corn Pudding Recipe: A Sweet and Creamy Southern Delight for Every Occasion

Corn Pudding recipe

Enjoy the Authentic Corn Pudding: A Southern Delight for Every Occasion.

Corn Pudding is a genuine recipe from the Southern United States that becomes a perfect delight to accompany chicken, turkey, ham, or roast pork (pernil). This straightforward preparation stands out as an ideal choice for both Thanksgiving and Christmas dinners. The first time I prepared this recipe for Thanksgiving, my husband was captivated by this dish. Its charm was so irresistible that it quickly became a tradition for our family celebrations and even our barbecue days!


Today, it is one of our favorite dishes, and I am excited to share with you this Southern recipe that has conquered our taste buds and become a classic in our festivities. Discover how to make this authentic Corn Pudding and add a Southern touch to your celebrations and family gatherings. I guarantee it will become a beloved choice at your table!


Corn Pudding 

This is not the dessert Majarete recipe. It is a savory side dish.

Ingredients:
5 to 7 fresh corn cobs or 2 cans of corn (850 g)
⅓ cup sugar (65 g)
1 teaspoon salt or to taste
3 eggs 1 cup milk (120 g)
1 cup half-and-half or cream (237 ml)
3 tablespoons melted unsalted butter (43 g)
½ teaspoon freshly grated nutmeg
2 Tablespoons cornstarch 


Instructions:
1. Grease an 8x11.5-inch PYREX baking dish. Preheat the oven to 350°F (175°C).

2. Cut the corn from the cob, slicing from top to bottom. Halve the corn grains and scrape the remaining kernels. Alternatively, if you prefer, you can use canned corn; you'll need 2 cans of corn.

3. In a large bowl, combine the corn, sugar, and salt. Add the three lightly beaten eggs, milk with dissolved cornstarch, cream, and butter; stir until thoroughly combined.

4. Transfer the mixture into the greased PYREX baking dish. Sprinkle with freshly grated nutmeg. Place the dish in a water bath and bake at 350°F (175°C) for 45-50 minutes or until a knife inserted in the center comes out clean. The result will be akin to a gel or custard, with a buttery soft-set texture, offering a delightful sweetness.


thanksgiving side dish


If you enjoyed this recipe, you might also be interested in:


Teach your children right from wrong, and when they are grown they will still do right. - Proverbs 22:6 

Time for Barbecuing and Brine for Turkey and Pernil (Ham)


Here you will find the recipe for Brine to Roast and Bake Perfect, Juicy, and Flavorful Chicken, Turkey, or Pernil (Pork Leg).  In addition to this post, we highly recommend you also read Bake the Perfect Chicken, Turkey, or Pernil to ensure culinary success in your baking endeavors.
 
It's time to enjoy with family and prepare delicious barbecues. In the United States, we celebrate Independence Day on July 4th, and traditionally, this date is associated with fireworks, barbecues (BBQ), picnics, and family gatherings. That's why this post is dedicated to that day and to all the hot days when we like to cook light and easy-to-prepare dishes, but also, I have shared a great method to bake the perfect Turkey for upcoming festivities so read on.   


I've taken a short break from indoor cooking and have been grilling almost daily. I've made roasted chicken, hot dogs, beef and chicken skewers (my favorites!), chops, burgers (also favorites), fish, and ribs. Oh, I also love toasting casabe and ripe plantains (yellow plantains) on the grill—they turn out delicious! 


In today's post, I won't provide a specific recipe because grilling is all about experimentation with various marinades, and of course, avoiding overcooking. Instead, I'll share valuable tips that have significantly enhanced the flavor of my grilled meats. Over the past three weeks, I've seized the opportunity to refine my grilling techniques, and now, my roasts rival those of my husband, proclaimed "The King of the BBQ" at home.


Shish Kabobs

Kabobs are a breeze to prepare, requiring minimal cooking time—around 12 to 15 minutes—similar to chicken breasts and fish. The versatility of kabobs shines as you can experiment with different vegetables, cuts of meat, and marinades. To ensure even cooking of both meat and veggies, it's crucial to cut everything into uniform sizes. Personally, I marinate the 1-inch meat cubes the night before using a flavorful Dominican Sazón (seasoning). It's worth noting that Dominican sazón, is all natural ingredients, and isn't a spicy seasoning.

The following day, assembling and grilling the kabobs is a swift process. Opt for a clean, oiled grill to prevent sticking. For an added burst of flavor, brush the kabobs with BBQ sauce just before removing them from the grill—this step is entirely optional.


Are you in a hurry to BBQ a Chicken?
A way to prepare grilled chicken quickly is by steaming it in a pressure cooker for 15 minutes or in a regular pot for 30 minutes. Then all you have to do is place in the grill to brown and finish cooking.


Brine

On the topic of enhancing tenderness, moisture, and flavor, consider employing the technique of brining. Whether it's ribs, chicken, or chops, leaving the meat in brine overnight ensures optimal results. If time is a constraint, even an hour of brining before cooking can make a significant difference. This method is versatile and extends to Turkey and ham (pernil) preparation during Thanksgiving and Christmas before oven baking. The result? Crispy on the outside, moist on the inside chicken that is sure to delight. It is easy, hassle-free and best of all there is no need to get your hands greasy with butter or seasoning, the salt water does it all for you. The sugar and honey in the brine help your meat to brown naturally with an appetizing color.

How Long to Brine?

The longer you leave the meat in brine, the saltier it will become. With the recipe I'll provide below, you don't have to worry because it doesn't require much salt and can last up to two days. After placing the meat in the container, you should refrigerate it until you're ready to cook. For more information on baking a turkey or ham (pernil), you can read: Preparation of Turkey and Pernil.

The list specifies the minimum time the meat should stay in brine, but it's better if it lasts for 24 hours.

A whole chicken (4 pounds) 4-12 hours
Chicken pieces 1- 2 hours
Whole turkey 1-2 days
Ham (pernil) 1-2 days
Turkey breast 5-8 hours
Pork chops or Ribs 8-12 hours


Chicken in brine


Pernil (ham- Pork Shoulder) in brine


Mari’s Brine

Desiring tender, moist, and flavorful ribs, chicken, and chops? Brining holds the key. I recommend leaving the meat in brine the night before. This technique can also be applied to turkey and ham (pernil) for Thanksgiving and Christmas, ensuring a succulent result when baked in the traditional oven. The outcome? Chicken that's wonderfully crispy on the outside and delightfully moist on the inside.

Ingredients:
8-10 cups water enough to cover the meat
¼ cup salt  or ½ cup Kosher Salt
2 Tablespoons brown sugar
1 teaspoon black pepper
5 cloves garlic (crushed) more if you like 
3 teaspoons oregano - more if you like
3 Tablespoons honey or maple syrup
2 teaspoons mustard
½ cup sour orange or vinegar 
Herb of your choice (e.g., thyme, Rosemary, coriander etc.)


Instructions:
1. In a small pot, mix the salt, sugar, and honey with a bit of water. Heat until dissolved.

2. Combine the salt water with the rest of the ingredients in a larger container.

3. Submerge until fully covered the chicken or other meat preference in the seasoned water, cover, and refrigerate for 1-2 days.

4. When ready to bake, remove the meat from the brine, drain, and discard the salty water.  There is no need to add more seasoning. Trust me the bird has absorbed all the flavors and will taste delicious.

5. Bake or roast the meat as usual, keeping in mind that marinated meats cook faster. For turkey and Pork Shoulder (Pernil), I suggest baking it covered until the meat becomes tender. This not only saves time but also ensures thorough cooking on the inside. Maintain a temperature of 325°F (190°C), and the tenderizing process may span 3-6 hours, contingent on its size. To assess tenderness, simply poke the meat with a fork; if it easily penetrates in and out, it's tender enough to uncover. Proceed to bake uncovered until achieving the desired browning.


Yield: This recipe, as is, is for 3-5 pounds of meat (1.5-2 kilograms). For more pounds of meat, double or triple the ingredients.


Notes:
a) For every additional ten cups of water you use, add ¼ cup more salt.

b) For a turkey or ham (pernil) weighing 12-15 pounds, I use 3/4 cup of salt and 7 liters of water—generous enough to cover the meat.


Chicken Kabobs with Arroz Frío (Cold Festive Rice), corn, and roasted ripe plantain.


Give, and it will be given to you. A good measure, pressed down, shaken together and running over, will be poured into your lap. For with the measure you use, it will be measured to you. - Luke 6:38


Related Articles:
How to Brine Turkey

Buttermilk Biscuits Recipe: Soft and Tender Biscuits Perfect for Any Meal


Looking for an easy and delicious homemade biscuit recipe? Look no further than these Buttermilk Biscuits! Made with buttermilk, these biscuits have a soft and tender texture that's almost bread-like. They're the perfect side dish for gravy, country-style fried chicken, or chili. Follow this simple recipe to create your own batch of mouth-watering Buttermilk Biscuits in no time! 


how to make Biscuits


how to make Buttermilk Biscuits

Buttermilk Biscuits Recipe: Soft and Tender Biscuits Perfect for Any Meal

These delicious Buttermilk Biscuits are made with buttermilk, giving them a soft and tender, almost bread-like crumb. They are the perfect accompaniment to gravy, country-style fried chicken, or chili.

Ingredients:
3 cups sifted all-purpose flour (384 gr)
½ scant teaspoon salt (3 gr)
½ teaspoon baking soda (3 gr)
4 teaspoons baking powder (24 gr)
1 tablespoon of sugar (optional, 12 gr)
⅔ cup shortening or lard (68 gr)
1 cup + 2 tablespoons buttermilk (256 ml) * see notes


Preparation:
1. Preheat the oven to 400F (200C). Sift the flour, salt, baking soda, and baking powder into a large bowl. Using a pastry blender or 2 knives, cut in the shortening until the mixture resembles cornmeal.

2. Drizzle the buttermilk over the entire surface of the flour mixture. Stir vigorously with a wooden spoon for 2 to 3 minutes until the dough stiffens. Continue to stir for a few minutes longer.

3. Gather the dough into a ball and turn it out onto a well-floured board. Sprinkle a little flour (about 1 tablespoon) over the dough. (The dough will be sticky.) Gently flatten the dough into a thick, round cake. Knead for 1 minute by folding the outer edge of the dough into the center of the circle and giving a light knead as the sides are folded in to overlap each other. Turn the folded side down and dust lightly with flour if needed.

4. Roll the dough out to ½ inch thick. Prick the surface all over with a fork and cut the biscuits with a floured 2-inch cutter. To ensure straight sides, press the cutter into the dough and lift up quickly and sharply without wiggling. Arrange the biscuits ½ inch or more apart on a baking sheet. Bake at 450°F for 13 minutes until golden brown. Remove from the oven and let sit for 3 to minutes.


Notes: 
a) You can easily make your own buttermilk by adding 1 tablespoon of white distilled vinegar, cider vinegar, or lemon juice to 1 cup of milk and letting it stand for 5 to 10 minutes before using.

b) The interior of the biscuits should be light, soft, and white in color. Cool on a wire rack. For crusty biscuits, cool them uncovered. If a softer crust is desired, wrap the hot biscuits in a clean dish towel. Serve hot.

c) A sweet variation to these biscuits is brushing the tops with honey as soon as you take them out of the oven.


Yield: 16 biscuits.


If you liked this recipe, you might be interested in:


Wherefore, sirs, be of good cheer: for I believe God, that it shall be even as it was told me. - Acts 27:25

Easy Cornbread Dressing or Stuffing


Indulge in the comforting flavors of the holiday season with our delectable recipe for Southern cornbread stuffing. This savory and aromatic dish is the perfect accompaniment to your festive feast, adding a delightful twist to traditional stuffing. With a harmonious blend of cornbread, herbs, and savory seasonings, our recipe is EASY to follow and promises to elevate your holiday table with its irresistible flavors and irresistible aroma. Get ready to delight your guests with this mouthwatering cornbread stuffing that will leave everyone craving for more.


I'm glad I came across it. Now it’s a part of my family recipes that I will save for generations to come. It’s the perfect Thanksgiving side dish, and my daughters and I love it all year round. It’s even more delicious with herbed gravy.


Serve this stuffing with turkey or any roast as a side dish. Enjoy!


Recipe for Cornbread Stuffing 

This Southern cornbread stuffing recipe is a cherished creation from Holly Crawford, a talented freelance writer and editor whose work has graced the pages of esteemed publications like Good Housekeeping, Cosmopolitan, and Seventeen. Originally featured in Good Housekeeping magazine, this beloved recipe has stood the test of time in my family, and I am grateful to share it with you today. 

If you're in search of a soft, moist, and delicious Cornbread recipe, I highly recommend my exclusive recipe found here: Homemade Cornbread Recipe, while the recipe below is ideal for creating a stuffing texture, it may not deliver the delightful treat you're after. So, for a mouthwatering cornbread that's perfect as a side dish or a snack, try my recipe today!

Ingredients: 
Corn Bread 
2 tablespoons vegetable oil
1 cup cornmeal
¾ cup all-purpose flour
1 tablespoon baking powder
¾ teaspoon salt
1 large egg, lightly beaten 
⅔ cup whole milk

Dressing
1 loaf of firm white bread, sliced or (½ loaf of firm white bread and ½ loaf of firm whole wheat bread)
4 tablespoons margarine or butter
5 medium stalks celery, chopped
1 large onion, chopped
1 ½  cup milk
1 teaspoon black pepper
1 teaspoon poultry seasoning or (1 teaspoon of thyme, ¼ teaspoon of rosemary, 1½ teaspoon of parsley, and ½ teaspoon of salt or to taste)
3 large eggs, lightly beaten
1 cup chicken broth


Preparation:
1. Prepare cornbread: 
  • Preheat oven to 350°E. Pour oil into an 8" by 8" metal baking pan; place the pan in the oven while the oven preheats. 
  • Meanwhile, in a medium bowl, with a spoon, mix cornmeal, flour, baking powder, and salt. Stir in egg and milk just until blended (batter will be lumpy). Spread batter over oil in a baking pan. 
  • Bake Corn Bread 15 minutes or until the top is browned and the toothpick inserted in the center comes out clean. Do not turn the oven off. Cool in pan on wire rack. 

2. Prepare dressing: 
  • Divide breads between 2 large cookie sheets. and bake for 15 to 20 minutes or until golden brown, rotating pans halfway through toasting and turning slices over once. Transfer breads to wire racks to cool. 
  • In a food processor, pulse sliced bread 5 or 6 times or until broken into about 1/2-inch pieces. It's okay if pieces vary in size.
  • Transfer bread pieces to a very large bowl. Coarsely crumble cornbread into the bowl with bread; set aside.

3. In a nonstick 12-inch skillet, melt margarine over medium heat. Add celery and onion and cook for 13 to 15 minutes or until vegetables are tender, stirring occasionally. Stir in milk, pepper, and poultry seasoning. Cook for 1 minute or just until the mixture begins to simmer, but do not boil.

4. Pour vegetable mixture over breads. Add lightly beaten eggs and broth and toss to mix well. Spoon dressing into a greased 13" by 9" glass baking dish. Bake, uncovered, in a preheated 325 F (165 C) oven for 45 minutes or until heated through and lightly browned on top.


 Yield: 12 servings (12 cups).


Notes:
a) If you are not making dressing right away, cover the cornbread with foil and reserve, this cornbread stays fresh for up to 2 days.

b) If not making dressing right away, store bread pieces in large self-sealing plastic bags at room temperature for up to 1 week.


If you liked this recipe, check out these other holiday and special occasion recipes and ideas!


For everything God created is good, and nothing is to be rejected if it is received with thanksgiving. - 1 Timothy 4:4.

Gravy Recipe, Easy, from Scratch


Elevate your culinary creations with this Herbed Brown Gravy recipe, a delightful twist on the traditional pan gravy. Infused with a blend of aromatic herbs, this savory delight adds an elegant touch to your dishes. Ditch the canned gravies and experience the richness of homemade goodness. 


Once you savor the unique flavor, you'll never go back! Commonly paired with pork, chicken, lamb, turkey, beef, meatloaf, American-style biscuits, mashed potatoes, stuffing, and sandwiches, this versatile Herbed Brown Gravy is a must-have in your repertoire. 


Homemade Herbed Brown Gravy 

Gravy Recipe, Easy, from Scratch

Enhance your culinary experience with this Herbed Brown Gravy, turning every meal into a memorable feast. Unleash your creativity by experimenting with different herb combinations to suit your taste buds. Elevate your cooking and bid farewell to store-bought gravies forever!


Ingredients: 
For Chicken Stock: 
Back and wing tips reserved from a chicken or turkey
1 stalk celery with leaves, chopped 
1 onion, quartered 
3½ cups cold water 

For Herbed Brown Gravy: 
4 tablespoons unsalted butter - 
1/3 cup all-purpose flour 
1/4 teaspoon of each: thyme, rosemary, and parsley  
Salt and pepper to taste 


Instructions: 
1. Chicken Stock: 
  • In a medium saucepan, combine chicken wing tips and the back parts, chopped celery, sliced onion, and water. 
  • Bring to a boil. Reduce heat and simmer for 1 hour. 
  • Strain the stock into a bowl, cover, and refrigerate. Skim off any fat. 
  • Reserve for future use or proceed with the Herbed Brown Gravy recipe. 

2. Herbed Brown Gravy: 
  • In a saucepan melt 4 tablespoons of butter over medium heat. Stir in 1/3 cup of all-purpose flour, cooking and stirring constantly until the flour turns a chestnut brown in color. 
  • Remove from heat. Add 2½ cups of the prepared chicken stock, mixing well with a whisk. Bring to a simmer while whisking constantly until the mixture is smooth. 
  • Reduce heat, and season with thyme, ground rosemary, parsley, salt, and pepper. 
  • Simmer for 15 minutes, stirring occasionally. 
  • Serve this delectable Herbed Brown Gravy with chicken, mashed potatoes, or biscuits. 

For a perfect pairing, check out our Buttermilk Biscuits recipe


Notes:
a) To ensure a smooth, silky consistency in your gravy, strain it if there are any lumps from the flour after adding the broth and whisking. Cook over low heat until it reaches the desired thickness, keeping in mind that it will thicken further as it cools.

b) Store any leftover gravy in the refrigerator for up to 3 days. If you need to thin the consistency, simply add more broth or water and heat through before serving.


The LORD is good, a refuge in times of trouble. He cares for those who trust in him, - Nahum 1:7

Recipes and Tips