Delicious Spongy Cake


En Español
This is my Thanksgiving Day cake. This is a very versatile cake and easy to do. After having it for eight years, on my way to the supermarket I lost the original recipe! Luckily I remembered how to do the cake batter  for this spongy cake, but the white chocolate frosting it called for, I could not remember at all. I chose to do it with MERINGUE since I wanted an easy and white frosting that will hold well until tomorrow. As it's to celebrate Thanksgiving I used cranberry sauce mix with strawberry jam to decorate this cake, however you can use strawberry jam or any other flavor you wish. I gave it a  tropical touch by using coconut flakes mixed with meringue for the filling.

Recipe for a Spongy Cake with Nuts

 
Ingredients:
For Cake 
4 egg yolks
2 whole eggs
1 ½ cups of sugar
½ cup butter or margarine cut up in cubes
1 cup hot milk
2½ ups all-purpose flour
1 tablespoon baking powder
1 teaspoon vanilla
½ cup chopped almond, walnuts or pecans

For Frosting:
1 cup of sugar
¼ cup water
3- 4 egg whites (4 oz or ½ cup)
½ teaspoon cream of tartar
1 teaspoon vanilla (5 ml)

To decorate 
⅔ cups shredded fresh coconut
cranberry jam (sauce)
dry fruits
walnuts or pecans


Instructions:
1. Preheat oven to 350°F Grease and flour three 9-inch round cake pans.

2. To make the cake: In a large mixing bowl, beat the egg yolks, whole eggs and sugar with an electric mixer for at least 5 minutes or until light and fluffy. Stir the butter or margarine pieces into the hot milk until the butter has melted. Combine the flour with the baking powder. Add lf 2 cup of the flour mixture into the egg mixture, beating slowly. Add half the hot milk mixture, 1 cup of the flour mixture, then the remaining hot milk, beating. After each addition. Add the remaining flour mixture and the vanilla. Beat well. Fold in the nuts. Pour the batter into the prepared pans.

3. Bake the layers in the 350°F oven for 12 to 15 minutes or until a wooden toothpick inserted in the centers comes out clean. Cool for 5 minutes in the pans. Remove the cakes from the pans and cool completely on wire racks.

4. To make the frosting: In a medium saucepan, combine the sugar with the water. Bring the mixture to boiling and boil for 7 minutes or until it is syrup thickens. (Undissolved sugar will make the frosting grainy.) Make sure to scrape down the sides of the saucepan.

5. In a large mixing bowl, beat the egg whites with the cream of tartar with an electric mixer until foamy. Slowly pour the hot sugar syrup into the egg whites, beating constantly at the highest speed for 4 to 6 minutes or until the frosting is stiff enough to spread and cooled. Use a rubber spatula to guide the egg whites toward the beaters and scrape down the sides of the bowl to be sure that the frosting is evenly mixed. Beat in the vanilla. The finished frosting should be smooth and fluffy, yet hold stiff peaks.

6. Place a cake layer on a cake plate; spread with about 1 cup of frosting and sprinkle with ⅓ cup of coconut. Repeat with the remaining layers.

Serves 12


Note:
a) The cake can be frosted and filled with a wide variety of flavors. My favorite fillings are vanilla custard and praline.

b) The recipe for the meringue frosting half of the Dominican frosting recipe shown in this blog.


Always giving thanks to God the Father for everything, in the name of our Lord Jesus Christ. - Ephesians 5:20

Potato Pie

 
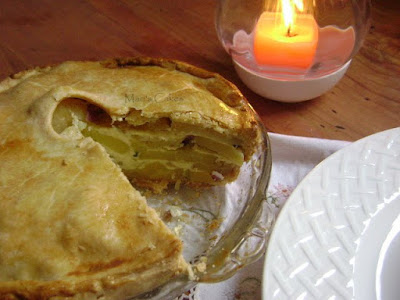
This potato pie or tart with its delicious filling is an excellent alternative to serving potatoes as a side dish for any meal. Additionally, you can serve it with salad for a light lunch. I hope you like it as much as everyone in my house does. From my kitchen to yours, enjoy!


Potato Pie Recipe 

Ingredients:
1 lb + 9oz potatoes, peeled and sliced thinly
2 scallions, chopped finely
1 red onion, chopped finely
2/3 cup heavy cream
2 eggs, lightly beaten
Salt and pepper
 
For the Pie dough: See steps and instructions on how to do it here: Easy Pie Crust.
2 ½ cups flour
1 cup (2 sticks) unsalted butter
1 teaspoon salt
1 teaspoon granulated sugar
3-6 tablespoons ice water


Instructions:
1. Lightly grease a baking sheet. Bring a saucepan of water to boil, then add the sliced potatoes and bring back to a boil, simmer for a few minutes. Drain the potato slices and leave to cool. Dry off any excess moisture with paper towels.

2. In a bowl, mix together the spring scallions, red onion, and the cooled potato slices. Stir in 2 tbsp and cream and plenty of seasoning.

3. Divide the pastry in half and roll out one piece to a 11.5-inch round. Roll the remaining pastry to a 10-inch round and cut a steam vent in the middle of the pastry.

4. Place the larger circle on to the baking sheet and fill with the potato mixture, leaving a 1/2-inch border. Brush this border with a little of the beaten egg.

5. Top with the other pastry disk, seal well, and crimp the edges of the pastry. Brush with the beaten egg and bake in a preheated oven, 400˚F for 30 minutes.

6. After 30 minutes of baking, mix the remaining beaten egg with the rest of the cream and pour into the pie through the steam vent. Return to the oven for 15 minutes, then leave to cool for 30 minutes. Serve warm or cold.


Note: You can use 1 pound ready -made puff pastry for this recipe if you want to skip preparing your own crust. The filling can be prepared up to four hours in advance.


I used the top of an olive oil bottle to make the steam vent.


After 30 minutes of baking, pour the mixture of egg and cream into the pie through the steam vent, and bake for 15 more minutes.


For out of the overflow of the heart the mouth speaks. The good man brings good things out of the good stored up in him, and the evil man brings evil things out of the evil stored up in him. - Matthew 12:34-35.

1st Blog Anniversary

Today is my first BLOG ANNIVERSARY!! I can not believe how fast time has passed. It has been a year unparalleled, full of pleasant emotions and the opportunity to meet new friends from all over the world, people who are creative and inspiring. Since I posted my first recipe Dominican Chicken Soup Mari's Style, until today,  Mari's Cakes Blog has been a place of growth, inspiration and new ideas.

THANK YOU for reading my posts, for cooking my recipes and sending photos, for sending emails thanking or congratulating me, for taking time to leave a comments and also those who have trusted me and I have given me awards. FYI, I have reserved a space dedicated to the blog awards I receive from fellow blogger friends.  You are more than welcome to visit here: Prizes, Awards to Mari's Cakes.

I never thought that in such a short time this blog would have so many readers and a little more than 500 friends who follow it. I am amazed on how many recipes I have published and this is just beginning. WOW! To me this is a place for recreation, a place where I can share my ideas and dedicate the recipes to my family and friends. As I said before, being able to see my recipes published is like bringing to life my recipes scrapbook. With God's will I hope to continue to share with you my 20 years experience in kitchen adventure with all the love and passion that cooking for our loved ones deserves. I clarified that I am not a professional chef, nor a cooking professor, I  just love cooking, I learned to cook for love and with love. 

Don't stay out, grab a piece of the cake and celebrate Mari's Cakes 1st blog birthday! See the photos on the spanish version of this entry: Here!

Thanks for visiting :)

Buttermilk Biscuits Recipe: Soft and Tender Biscuits Perfect for Any Meal


Looking for an easy and delicious homemade biscuit recipe? Look no further than these Buttermilk Biscuits! Made with buttermilk, these biscuits have a soft and tender texture that's almost bread-like. They're the perfect side dish for gravy, country-style fried chicken, or chili. Follow this simple recipe to create your own batch of mouth-watering Buttermilk Biscuits in no time! 


how to make Biscuits


how to make Buttermilk Biscuits

Buttermilk Biscuits Recipe: Soft and Tender Biscuits Perfect for Any Meal

These delicious Buttermilk Biscuits are made with buttermilk, giving them a soft and tender, almost bread-like crumb. They are the perfect accompaniment to gravy, country-style fried chicken, or chili.

Ingredients:
3 cups sifted all-purpose flour (384 gr)
½ scant teaspoon salt (3 gr)
½ teaspoon baking soda (3 gr)
4 teaspoons baking powder (24 gr)
1 tablespoon of sugar (optional, 12 gr)
⅔ cup shortening or lard (68 gr)
1 cup + 2 tablespoons buttermilk (256 ml) * see notes


Preparation:
1. Preheat the oven to 400F (200C). Sift the flour, salt, baking soda, and baking powder into a large bowl. Using a pastry blender or 2 knives, cut in the shortening until the mixture resembles cornmeal.

2. Drizzle the buttermilk over the entire surface of the flour mixture. Stir vigorously with a wooden spoon for 2 to 3 minutes until the dough stiffens. Continue to stir for a few minutes longer.

3. Gather the dough into a ball and turn it out onto a well-floured board. Sprinkle a little flour (about 1 tablespoon) over the dough. (The dough will be sticky.) Gently flatten the dough into a thick, round cake. Knead for 1 minute by folding the outer edge of the dough into the center of the circle and giving a light knead as the sides are folded in to overlap each other. Turn the folded side down and dust lightly with flour if needed.

4. Roll the dough out to ½ inch thick. Prick the surface all over with a fork and cut the biscuits with a floured 2-inch cutter. To ensure straight sides, press the cutter into the dough and lift up quickly and sharply without wiggling. Arrange the biscuits ½ inch or more apart on a baking sheet. Bake at 450°F for 13 minutes until golden brown. Remove from the oven and let sit for 3 to minutes.


Notes: 
a) You can easily make your own buttermilk by adding 1 tablespoon of white distilled vinegar, cider vinegar, or lemon juice to 1 cup of milk and letting it stand for 5 to 10 minutes before using.

b) The interior of the biscuits should be light, soft, and white in color. Cool on a wire rack. For crusty biscuits, cool them uncovered. If a softer crust is desired, wrap the hot biscuits in a clean dish towel. Serve hot.

c) A sweet variation to these biscuits is brushing the tops with honey as soon as you take them out of the oven.


Yield: 16 biscuits.


If you liked this recipe, you might be interested in:


Wherefore, sirs, be of good cheer: for I believe God, that it shall be even as it was told me. - Acts 27:25

I Love You No Matter What, Chocolate Chips Cookies


En Español
Last Sunday was my daughter Crystal's 19th birthday! Wow, I can't believe I have an adult daughter who is already in the university, and has begun her career in the medical field! The truth is that the years have gone by so fast and Crystal has been a very good girl. She has always exceeded with excellence my expectations for her. I admire her as a young woman and love her very much. May God continue to bless her abundantly and may all her wishes be fulfilled.

Because we have been baking cakes daily the last two years , on our birthdays we look forward to something different other than a cake. We don't miss out very much because we can always enjoy a delicious piece of cake whenever we want. The fact that I prepare my girls a dessert of their choice makes it very special.

Since she was a child, Crystal, always liked cookies so much that we nicknamed her COOKIE.  It is no surprise that for her birthday she requested that we celebrated with her favorite cookie recipe. I wanted to make this a special post, so I decided to combine her favorite cookie recipe with her favorite childhood story book, hence the name of this recipe: I love you no matter what, chocolate chip cookies. To all chocolate chips cookies lovers, here is the one and only, a classic and favorite...


I love you no matter what chocolate chip cookies recipe


Ingredients:
3½ cups all-purpose flour
1 teaspoon of baking soda
½ teaspoon salt
1 cup of butter or margarine
1 cup of granulated sugar
1 cup of brown sugar
1 teaspoons of vanilla
2 large eggs
2 teaspoons of sour cream (opcional)
1 ½ - 2 cups of semi- sweet chocolate chips
1 cup of walnuts or pecans


Preparation:
1. Preheat of to 350F.(175C)

2. Stir together flour, baking soda and salt, set aside. With the flat beater, beat butter with sugars until creamy and lighten in color (about 4 minutes). Stop and scrape bowl about twice during this process.

3. Add vanilla, stir and add eggs one at a time mixing on low speed until incorporated. Gradually add dry mixture and mix about 2 minutes.

4. Add chocolate chips and nuts (if desired), stir with a wooden spoon Until well combined. Refrigerate overnight.

5. Drop rounded teaspoonful or tablespoons onto ungreased baking sheets, about 2 inches apart. Bake for 10 to 12 minutes. Remove from baking sheets immediately and cool on wire racks.

Yield: About 4-5 dozens. Quantity may vary depending on the size you make the cookies.

Variations: Two cups raisins, coconut, or chopped walnuts may be substituted for chocolate chips or mix one cup with the chocolate chips.


ISBN 0-15-202061-6

Dedicated to my dear cookie, we love you, Mom & Dad : )


You who are young, be happy while you are young,and let your heart give you joy in the days of your youth. Follow the ways of your heart and whatever your eyes see, but know that for all these things God will bring you into judgment. - Ecclesiastes 11:9

Subscribe and receive Mari's Cakes updates via email. Enter your email address:

Complete your subscription in your activation email from feedburner.

Easy Cornbread Dressing or Stuffing


Indulge in the comforting flavors of the holiday season with our delectable recipe for Southern cornbread stuffing. This savory and aromatic dish is the perfect accompaniment to your festive feast, adding a delightful twist to traditional stuffing. With a harmonious blend of cornbread, herbs, and savory seasonings, our recipe is EASY to follow and promises to elevate your holiday table with its irresistible flavors and irresistible aroma. Get ready to delight your guests with this mouthwatering cornbread stuffing that will leave everyone craving for more.


I'm glad I came across it. Now it’s a part of my family recipes that I will save for generations to come. It’s the perfect Thanksgiving side dish, and my daughters and I love it all year round. It’s even more delicious with herbed gravy.


Serve this stuffing with turkey or any roast as a side dish. Enjoy!


Recipe for Cornbread Stuffing 

This Southern cornbread stuffing recipe is a cherished creation from Holly Crawford, a talented freelance writer and editor whose work has graced the pages of esteemed publications like Good Housekeeping, Cosmopolitan, and Seventeen. Originally featured in Good Housekeeping magazine, this beloved recipe has stood the test of time in my family, and I am grateful to share it with you today. 

If you're in search of a soft, moist, and delicious Cornbread recipe, I highly recommend my exclusive recipe found here: Homemade Cornbread Recipe, while the recipe below is ideal for creating a stuffing texture, it may not deliver the delightful treat you're after. So, for a mouthwatering cornbread that's perfect as a side dish or a snack, try my recipe today!

Ingredients: 
Corn Bread 
2 tablespoons vegetable oil
1 cup cornmeal
¾ cup all-purpose flour
1 tablespoon baking powder
¾ teaspoon salt
1 large egg, lightly beaten 
⅔ cup whole milk

Dressing
1 loaf of firm white bread, sliced or (½ loaf of firm white bread and ½ loaf of firm whole wheat bread)
4 tablespoons margarine or butter
5 medium stalks celery, chopped
1 large onion, chopped
1 ½  cup milk
1 teaspoon black pepper
1 teaspoon poultry seasoning or (1 teaspoon of thyme, ¼ teaspoon of rosemary, 1½ teaspoon of parsley, and ½ teaspoon of salt or to taste)
3 large eggs, lightly beaten
1 cup chicken broth


Preparation:
1. Prepare cornbread: 
  • Preheat oven to 350°E. Pour oil into an 8" by 8" metal baking pan; place the pan in the oven while the oven preheats. 
  • Meanwhile, in a medium bowl, with a spoon, mix cornmeal, flour, baking powder, and salt. Stir in egg and milk just until blended (batter will be lumpy). Spread batter over oil in a baking pan. 
  • Bake Corn Bread 15 minutes or until the top is browned and the toothpick inserted in the center comes out clean. Do not turn the oven off. Cool in pan on wire rack. 

2. Prepare dressing: 
  • Divide breads between 2 large cookie sheets. and bake for 15 to 20 minutes or until golden brown, rotating pans halfway through toasting and turning slices over once. Transfer breads to wire racks to cool. 
  • In a food processor, pulse sliced bread 5 or 6 times or until broken into about 1/2-inch pieces. It's okay if pieces vary in size.
  • Transfer bread pieces to a very large bowl. Coarsely crumble cornbread into the bowl with bread; set aside.

3. In a nonstick 12-inch skillet, melt margarine over medium heat. Add celery and onion and cook for 13 to 15 minutes or until vegetables are tender, stirring occasionally. Stir in milk, pepper, and poultry seasoning. Cook for 1 minute or just until the mixture begins to simmer, but do not boil.

4. Pour vegetable mixture over breads. Add lightly beaten eggs and broth and toss to mix well. Spoon dressing into a greased 13" by 9" glass baking dish. Bake, uncovered, in a preheated 325 F (165 C) oven for 45 minutes or until heated through and lightly browned on top.


 Yield: 12 servings (12 cups).


Notes:
a) If you are not making dressing right away, cover the cornbread with foil and reserve, this cornbread stays fresh for up to 2 days.

b) If not making dressing right away, store bread pieces in large self-sealing plastic bags at room temperature for up to 1 week.


If you liked this recipe, check out these other holiday and special occasion recipes and ideas!


For everything God created is good, and nothing is to be rejected if it is received with thanksgiving. - 1 Timothy 4:4.

Gingered Pumpkin Custard

  
The perfect dessert to have in autumn and a delicious way to celebrate Thanksgiving month. I always use canned pumpkin, but this year I decided to make it with Dominican auyama pumpkin from our farm, harvested just in time! I hope you enjoy this pumpkin delight.


Step by step photos and in español: Aquí


Recipe for a Delicious Gingered Pumpkin Custard

 
Ingredients:
Calabaza, auyama dominicana¾ cup sugar
2 eggs
1 ½ teaspoon ground cinnamon
½ teaspoon salt
½ teaspoon ground nutmeg
1 can ( 15 ounces) solid- pack pumpkin or fresh pumpkin see note below.
1 ¼ cups half-half
2-3 teaspoons ground ginger
Whipped cream for decorating (optional)
Sprinkles for decorating (optional)


Instructions:
1. Preheat oven to 375 F grease 1 ½ quart casserole or 8-inch glass baking dish. Variation: for individual servings, pour custard mixture into 6 or 8 ramekins or custard cups. Place on a baking sheet. bake for 35 to 40 minutes or until knife inserted in center comes out clean.

2. Combine sugar, eggs, cinnamon, salt and nutmeg in medium bowl; mix well. Add pumpkin and half-and-half, mix until well blended. Pour into prepared dish. Sprinkle ginger evenly over top of pumpkin mixture.

3. Bake 45 minutes or until knife inserted in center comes out clean. cool in wire rack at least 20 minutes before serving. serve warm or at room temperature. garnish with whipped cream and sprinkles.


Note:
Substitute for canned pumpkin: You'll need 3 pounds of pumpkin, after boiling and draining it reduces to approximately 1 pound and a little more (16oz). 

Steam cook with very little water until pumpkin is tender. Mash and drain well in a strainer or cheesecloth to remove as much water as possible. It is best  to use the pumpkin that is best to make pies, but in this case I used the auyama which is the pumpkin grown here in D.R. The only variation that I found with the auyama pumpkin, is that custard comes out darker in color and has a more fibrous texture, but it’s equally delicious.

He who is not with me is against me, and he who does not gather with me scatters. - Matthew 12:30