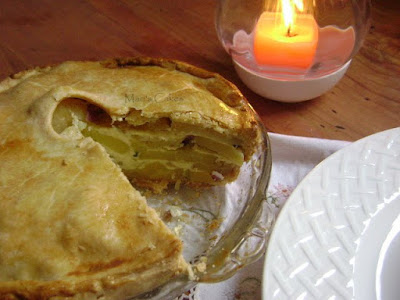
Potato Pie

 
This potato pie or tart with its delicious filling is an excellent alternative to serving potatoes as a side dish for any meal. Additionally, you can serve it with salad for a light lunch. I hope you like it as much as everyone in my house does. From my kitchen to yours, enjoy!


Potato Pie Recipe 

Ingredients:
1 lb + 9oz potatoes, peeled and sliced thinly
2 scallions, chopped finely
1 red onion, chopped finely
2/3 cup heavy cream
2 eggs, lightly beaten
Salt and pepper
 
For the Pie dough: See steps and instructions on how to do it here: Easy Pie Crust.
2 ½ cups flour
1 cup (2 sticks) unsalted butter
1 teaspoon salt
1 teaspoon granulated sugar
3-6 tablespoons ice water


Instructions:
1. Lightly grease a baking sheet. Bring a saucepan of water to boil, then add the sliced potatoes and bring back to a boil, simmer for a few minutes. Drain the potato slices and leave to cool. Dry off any excess moisture with paper towels.

2. In a bowl, mix together the spring scallions, red onion, and the cooled potato slices. Stir in 2 tbsp and cream and plenty of seasoning.

3. Divide the pastry in half and roll out one piece to a 11.5-inch round. Roll the remaining pastry to a 10-inch round and cut a steam vent in the middle of the pastry.

4. Place the larger circle on to the baking sheet and fill with the potato mixture, leaving a 1/2-inch border. Brush this border with a little of the beaten egg.

5. Top with the other pastry disk, seal well, and crimp the edges of the pastry. Brush with the beaten egg and bake in a preheated oven, 400˚F for 30 minutes.

6. After 30 minutes of baking, mix the remaining beaten egg with the rest of the cream and pour into the pie through the steam vent. Return to the oven for 15 minutes, then leave to cool for 30 minutes. Serve warm or cold.


Note: You can use 1 pound ready -made puff pastry for this recipe if you want to skip preparing your own crust. The filling can be prepared up to four hours in advance.


I used the top of an olive oil bottle to make the steam vent.


After 30 minutes of baking, pour the mixture of egg and cream into the pie through the steam vent, and bake for 15 more minutes.


For out of the overflow of the heart the mouth speaks. The good man brings good things out of the good stored up in him, and the evil man brings evil things out of the evil stored up in him. - Matthew 12:34-35.

1st Blog Anniversary

Today is my first BLOG ANNIVERSARY!! I can not believe how fast time has passed. It has been a year unparalleled, full of pleasant emotions and the opportunity to meet new friends from all over the world, people who are creative and inspiring. Since I posted my first recipe Dominican Chicken Soup Mari's Style, until today,  Mari's Cakes Blog has been a place of growth, inspiration and new ideas.

THANK YOU for reading my posts, for cooking my recipes and sending photos, for sending emails thanking or congratulating me, for taking time to leave a comments and also those who have trusted me and I have given me awards. FYI, I have reserved a space dedicated to the blog awards I receive from fellow blogger friends.  You are more than welcome to visit here: Prizes, Awards to Mari's Cakes.

I never thought that in such a short time this blog would have so many readers and a little more than 500 friends who follow it. I am amazed on how many recipes I have published and this is just beginning. WOW! To me this is a place for recreation, a place where I can share my ideas and dedicate the recipes to my family and friends. As I said before, being able to see my recipes published is like bringing to life my recipes scrapbook. With God's will I hope to continue to share with you my 20 years experience in kitchen adventure with all the love and passion that cooking for our loved ones deserves. I clarified that I am not a professional chef, nor a cooking professor, I  just love cooking, I learned to cook for love and with love. 

Don't stay out, grab a piece of the cake and celebrate Mari's Cakes 1st blog birthday! See the photos on the spanish version of this entry: Here!

Thanks for visiting :)

Buttermilk Biscuits Recipe: Soft and Tender Biscuits Perfect for Any Meal


Looking for an easy and delicious homemade biscuit recipe? Look no further than these Buttermilk Biscuits! Made with buttermilk, these biscuits have a soft and tender texture that's almost bread-like. They're the perfect side dish for gravy, country-style fried chicken, or chili. Follow this simple recipe to create your own batch of mouth-watering Buttermilk Biscuits in no time! 


how to make Biscuits


how to make Buttermilk Biscuits

Buttermilk Biscuits Recipe: Soft and Tender Biscuits Perfect for Any Meal

These delicious Buttermilk Biscuits are made with buttermilk, giving them a soft and tender, almost bread-like crumb. They are the perfect accompaniment to gravy, country-style fried chicken, or chili.

Ingredients:
3 cups sifted all-purpose flour (384 gr)
½ scant teaspoon salt (3 gr)
½ teaspoon baking soda (3 gr)
4 teaspoons baking powder (24 gr)
1 tablespoon of sugar (optional, 12 gr)
⅔ cup shortening or lard (68 gr)
1 cup + 2 tablespoons buttermilk (256 ml) * see notes


Preparation:
1. Preheat the oven to 400F (200C). Sift the flour, salt, baking soda, and baking powder into a large bowl. Using a pastry blender or 2 knives, cut in the shortening until the mixture resembles cornmeal.

2. Drizzle the buttermilk over the entire surface of the flour mixture. Stir vigorously with a wooden spoon for 2 to 3 minutes until the dough stiffens. Continue to stir for a few minutes longer.

3. Gather the dough into a ball and turn it out onto a well-floured board. Sprinkle a little flour (about 1 tablespoon) over the dough. (The dough will be sticky.) Gently flatten the dough into a thick, round cake. Knead for 1 minute by folding the outer edge of the dough into the center of the circle and giving a light knead as the sides are folded in to overlap each other. Turn the folded side down and dust lightly with flour if needed.

4. Roll the dough out to ½ inch thick. Prick the surface all over with a fork and cut the biscuits with a floured 2-inch cutter. To ensure straight sides, press the cutter into the dough and lift up quickly and sharply without wiggling. Arrange the biscuits ½ inch or more apart on a baking sheet. Bake at 450°F for 13 minutes until golden brown. Remove from the oven and let sit for 3 to minutes.


Notes: 
a) You can easily make your own buttermilk by adding 1 tablespoon of white distilled vinegar, cider vinegar, or lemon juice to 1 cup of milk and letting it stand for 5 to 10 minutes before using.

b) The interior of the biscuits should be light, soft, and white in color. Cool on a wire rack. For crusty biscuits, cool them uncovered. If a softer crust is desired, wrap the hot biscuits in a clean dish towel. Serve hot.

c) A sweet variation to these biscuits is brushing the tops with honey as soon as you take them out of the oven.


Yield: 16 biscuits.


If you liked this recipe, you might be interested in:


Wherefore, sirs, be of good cheer: for I believe God, that it shall be even as it was told me. - Acts 27:25