Carrot, Coconut and Cupcakes Cake


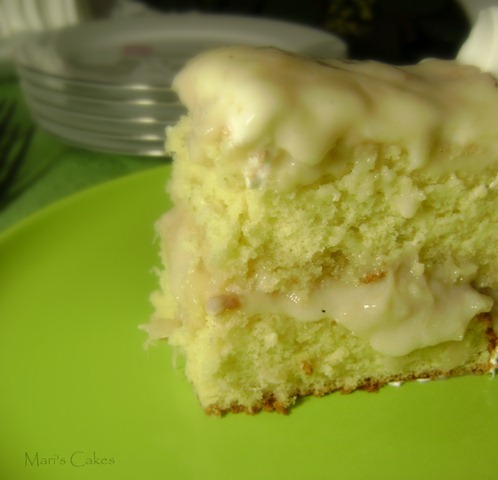
Yes you read it correctly, it is not a typo. This is a cake made of cupcakes!!

I chose to prepare this recipe from the blog, El Horno de María, to unite in mourning with other fellow bloggers who will also be posting recipes in memory of our deceased blogger friend, Mayte. My condolences to her family and friends

I am pleased to know that this recipe is over 50 years old, and it is one of many variations that Mayte’s grandmother prepared for her husband and children. The way this cake is prepared and it's  flavor transports me back to the past. I could imagine my grandmothers preparing something like this as well. What I most liked is that it has a nutritious filling made of a vegetable making it a delicious and healthy dessert.  Its taste is exquisite, the proof is in my daughter Ruby, she does NOT like to eat carrots in any form, yet she served herself twice of this dessert.


print recipe

Carrot, Coconut and Cupcakes Cake
Recipe from, El Horne de María’s, blog.
Ingredients:
  • 1 ¼ pound clean and chopped carrots
  • ½ cup sugar
  • 2 cups grated coconut
  • 8-10 cupcakes (see note b)
  • ¼ cup brandy (I used 1 teaspoon of vanilla)  For the Syrup:
  • 2 cups water
  • 1 ½ cups sugar
  • ¼ cup brandy (I used 2 teaspoons of vanilla)   For the Meringue:
  • 1 cup + 2 tablespoons white granulated sugar
  • ¼ cup water
  • ½ cup egg whites (of 3-4 eggs)
  • ½ teaspoon vanilla

Instructions:
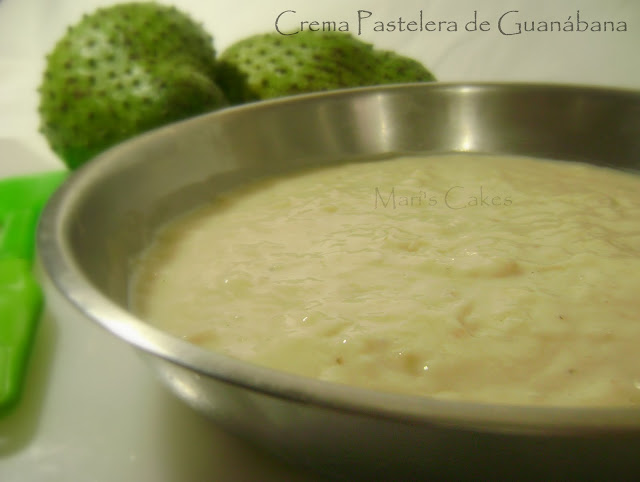
1. Cook the carrots until they are very tender, drain and make a puree. Add the sugar, coconut and brandy; mix. 2. Meanwhile, prepare the syrup with water and sugar about simmer for about 5 minutes. Add liqueur and continue to simmer a few more minutes. It should be a light consistency and not thick. 3. Cut the cupcakes into slices (I cut them in three sections). In a round mold, accommodate the first layer of cupcakes, and bathe that layer of cupcakes with the syrup to your taste. Note: when turned over this it will be the top layer of the cake. 4. Top with half of the coconut and carrot puree, place another layer of cupcakes, bathe with syrup and cover with the remaining puree. Placed the last layer of cupcakes on top and again slightly bathe with syrup. 5. Cover the cake with something that will separate it from the weight that you will put on top. Note: I cut a thick round cardboard the size of the cakeand and covered it with foil. 6. Press cake with about 12.5 lbs (5 kg) in weight and let stand overnight or at least 4 or 5 hours. 7. When ready, turn the cake over and place in serving plate. It should come out easily. 8. Prepare meringue and garnish to taste. Follow direction to make meringue: HERE Notes:
a) I recommend you see the step by step in pictures in Mayte’s blog: HERE
b) Depending on the size of pan you used you made need more or less cupcakes. I used a 10" spring form pan and used 18 cupcakes. You could use my vanilla cupcakes recipe.c) This recipe calls for meringue to decorate cake, but you could use any frosting of your preference, keeping in mind it should go according with the filling.  Whipped cream will be ideal.
Details
Prep time: Cook time: Total time: Yield: 10 servings


En español: AQUÍ


"..There is no substitute for the absence of a loved one, so do not even try it;" We must simply bear the separation and resist. At first this seems very hard, but at the same time, it is a great comfort. The unfilled void is left then becomes a link for union … On the other hand, the more richer and beautiful are the memories, the harder it makes the separation. But gratitude changes the torment in the memory in a quiet joy. One does not carry past beauty as a sting, but as a precious gift." - Dietrich Bonhoeffer

Soursop Cake, Bizcocho de Guanábana


The following recipe is from the book "El Arte de Vivir" (The Art of Living) by the Dominican author, Rosalia Gomez de Caro. While researching the book  year ago online I saw this cake. Since then I've been craving it, until at last I remembered, found the fruit and had time to make the recipe. I liked the cake very much and I'm sure it will be a dessert that I will do from now on every soursop season.

The cake consists of four recipes but they are all easy to make, I promise. en español: AQUÍ 


Soursop Cake, Bizcocho de Guanábana

 
Ingredients:
Sponge Cake (size 7”x 7”): 4 eggs separate
1 cup sugar (200 g)
2 Teaspoons vanilla (10 ml)
1 ½ cup all purpose flour (195 g)
pinch of salt
½ cup milk (118 ml)
½ cup butter (1 stick)
1 teaspoon grated lemon
1½ teaspoon baking powder

Syrup (to moisten the cake):
½ cup sugar (100 g)
½ cup liquid (juice) of soursop (118 ml)
½ cup water (118 ml)

Soursop Pastry Cream (yields more than enough):
2 cups milk divided (475 ml)
¼ cup cornstarch
2 egg yolks
¾ cup sugar (150 gr)
1½ cup pulp of soursop
For instructions: HERE

Italian Meringue:
1 cup egg whites (8-ounce exactly)
2 cups granulated sugar (400 gr)
½ cup water (110 gr)
1 teaspoon vanilla (5 ml)
For instructions: HERE

Preparation:
Cake
1. Prepare the soursop pastry cream preferably the day before. Preheat the oven to 350˚F. Grease two cake pans of 7 "(18 cm) or one 4-inch (10 cm) tall and line with wax paper at the base.
2. Heat the milk with the butter just until melted and add the lemon zest, reserve. Beat the egg whites at maximum speed until soft peaks is reached. Add the egg yolks one by one, then gradually add the sugar and vanilla.
3. Mix flour and salt; sift. Add the flour mixture to eggs slowly, on stir speed of a kitchenAid speed or fold with a spatula. Add the warm milk and finally the baking powder.
4. Bake for 30 minutes or until a toothpick inserted in the middle of the cake comes out clean. Cool and coat with syrup using a brush.


Look how soft it came out. It's definitely a cake recipe to bake.


Syrup
1. In a small pot mix the sugar, juice of the soursop and water. Let it boil until all the sugar dissolves and is slightly thickened (8 minutes). Note: After cooled the syrup tends to thicken, so be sure not to cook for longer then required, to be able to coated cake layers easily. When you are ready to decorate prepare the Italian meringue.

Serves 10-12 people

I used tip #826 Ateco for stripes.


More step by step photos and tips , also en español: AQUÍ.

Commit thy way unto the LORD; trust also in Him, and He shall bring it to pass. And He shall bring forth thy righteousness as the light, and thy judgment as the noonday. - Psalms 37:5-6

SOURSOP Pastry Cream, Crema Pastelera de GUANÁBANA


This recipe is an excellent combination of pastry cream with exotic fruit pulp such as soursop (Annona muricata). This cream is ideal to use as a cake filling. If you taste it once you'll fall in love with it! The Soursop Cake  goes well with this cream.

Soursop is the fruit of Annona muricata.

 Fruit pulp without seeds.

  Sieved pulp and its juice.

Nice and thick cream.

Cover with plastic like this until cooled.

Soursop Pastry Cream
This recipe is an adaption of Rosalia Gomez de Caro's recipe. 
guarda la receta

Ingredients:
2 cups milk divided
¼ cup cornstarch
2 egg yolks
¾ cup sugar
2 teaspoons vanilla
1 ½ cups soursop pulp

Instructions: 
1. Dissolve the cornstarch in 1 cup of milk, set aside. Beat 2 egg yolks with ¼ cup sugar until light yellow, then mix with milk and cornstarch.

2. Place the remaining milk in a saucepan with remaining sugar. When the sugar has dissolve, slowly add the cornstarch mixture and use a whisk to mix. Stir constantly with a wooden spoon over medium heat, until the cornstarch is cooked, it should be very thick cream. Add vanilla and mix.

3. Empty the cream into a bowl and cover with plastic until it touches the cream, leaving the sides loose until cool. This prevents a crust from forming. Cool completely and refrigerate for 2-3 hours or overnight. Squeeze soursop pulp with the help of a strainer, reserve the liquid. Mix the pulp with custard and ready. So easy, so delicious!  Now go ahead and make the Soursop /Guanabana Cake to fill with this cream.

Notes: 
a) You must wash the fruit, then peel and remove all the seeds with your hands before using.
b) Wonder if you can do with frozen pulp? Well ... YES! Allow the pulp to thaw a few minutes, squeeze and reserve the liquid to make syrup or juice.

Yield: 4 cups. 

You may also like to have the: Pastry Cream Recipe, ideal to use in Dominican Cake.

 En español: AQUÍ.

Proven faith brings experience. If you had not been obliged to pass through the rivers, you wouldn't have believed in your weakness, if you had not been sustained in the midst of the waters, you would have never get to know God's power. The more you exercise faith in affliction, the more it grows in strength, security and intensity. Faith is precious, and its trials are beautiful too. "- C.H. Spurgeon.

PASTA WITH SHRIMPS IN GARLIC SAUCE


I made this recipe with much appreciation, because it is a post where I get to participate with many other bloggers who have agreed to prepare a recipe from our fellow blogger friend, Tito, in order to cheer him up because he is going through a very sad moment. I did not hesitate in accepting this invitation because I find that the bond between friends in good faith is good, also because it is a way for me to send a hug through distance to a friend who is sad. From Dominican Republic, Mari's Cakes family sends a big hug and our deepest condolences to Tito in Spain.

The following recipe from Tito's blog, La Cocina sin Complicaciones (The Hassle-Free Kitchen), I invite you to visit his blog, he has a different and entertaining way to present his delicious and easy recipes. To see his shrimp recipe click, here.

Caserecce with Shrimps in Garlic Sauce

End of excuses for not preparing something delicious in a few minutes ... for a delicious dinner that's easy to prepare, I recommend this recipe.

Ingredients: 
2 cups caserecce or pasta of your choice
14 ounces peeled shrimps
3 garlic cloves sliced or mashed
2 cayenne peppers olive oil chopped parsley salt to taste

Instructions: 
1. Cook pasta in a large pot of salted boiling water and follow the manufacturer's instructions to cook pasta. In my case, I did not find the caserecce so I used mostacholis.
2. While the pasta is cooking, start with the garlic shrimps. Peel, wash and drain the shrimps.
3. In a frying pan over medium heat stir-fry garlic slices with the Cayenne peppers, when they turn golden, incorporate the shrimps and raise the fire a little. If some water is released from shrimps, drain it.
4. When the pasta is ready drain, then hold under running cold water for a second. Return to pot; mix with shrimp in garlic sauce. Add the parsley; adjust the salt and add a little olive oil. Enjoy!

Yield: 2 servings.

 More photos and receta en español: AQUÍ 

"Be strong and courageous. Do not fear or be in dread of them, for it is the LORD your God who goes with you. He will not leave you or forsake you." - Deuteronomy 31:6

Challah


Challah, has a very soft, sweet dough that is sweeten with honey. This elaborately plaited Sabbath loaf was first made by the Jews of Central Europe in the Middle Ages. They took the challah on their migration to Eastern Europe and the West. Sometimes this bread is made with up to twelve strands of dough; the one I show you today is a four- strand plait.

I’ll be honest ….. I messed up a little with the twisting and plaiting in my first bread, but the outcome was fantastic! I am now a pro after practicing the braiding with four strands. My second, third, fourth etc loaves were a success in both flavor a plaiting!

CHALLAH Recipe

Challah is a special braided Jewish bread, very soft and sweeten with honey instead of sugar. It's one bread you'll love to make over and over again.

Ingredients:
4 ⅔ cups all-purpose flour (512 g)
2 teaspoon sea salt
7 oz tepid water (205 ml)
0.6 oz cake compressed yeast or ¼ oz active dry yeast
3 medium eggs
3-4 tablespoons honey (65-89g)
⅓ cup sunflower oil or unsalted butter, melted and cooled (79 ml)
2 teaspoons poppy seeds or sesame seeds (optional)

Egg wash glaze: 
1 egg beaten with a pinch of salt

Instructions: 
1. Put the flour and salt in a large bowl, mix and make well in the center. In a small bowl place water and crumble yeast over it. Stir until dispersed. Pour into the well in the flour, and then add eggs, honey, and oil or butter. Mix ingredients in the well, then gradually work in the flour to make soft but not sticky dough.  
2. Turn out the dough onto a floured surface and knead thoroughly until very smooth and elastic (10 – 15 minutes). 
3. Place dough in a lightly oiled bowl, and then turn the dough over so the surface is coated in a thin film of oil (this prevents a skin forming). Cover bowl with plastic wrap. Let rise until doubled in size. 1½ hours at room temperature. 
4. Punch down risen dough to deflate, then cover and let rise again until doubled in size at room temperature (about 20 minutes). 
5. Turn out dough onto a floured surface, and punch down to deflate. Divide in four equal pieces. Roll each piece to form a rope about 16x1 inch thick. 
6. Technique #1 - Pinch ropes firmly together at one end, place in front of you side by side and slightly apart with the joint part on top. Put the far left strand under the 2 middle ones, and run it back over the last it went under. Run the far right strand under the twisted 2 in the middle, and then back over the last one it went under. Repeat until the dough is plaited. Pinch the ends together at the bottom. Technique #2 - Another way I do the braid is by the "over the over, under the under and criss-cross" method. SEE VIDEO below.
7. Transfer to the prepared baking sheet (greased), then place sheet in a plastic bag slightly inflated. Let rise at room temperature until double in size (about 45 minutes). Preheat oven to 425ºF.8. Carefully brush the loaf with two thin coats of egg glaze. Sprinkle seeds if using. Bake for 10 minutes in a preheated oven at, then reduce temperature to 375 F and bake for 30 minutes or until the loaf is golden brown and sounds hallow when tapped underneath. Cool on wire rack.


Notes: 
a) If using active dry yeast, then remove from the 7 oz of water ¼ cup and set aside. Mix the ¼ cup of water with yeast and 1 teaspoon of water, mix and let stand until double in size. Add to the flour before eggs and remaining water.
b) Raisins can be added in step #2 while kneading.
c) Best eaten within four days. Cooled loaf can be frozen up to one month. I can’t personally add to this, since in my home this loaf is eaten in two days.

Yield: 1 Large Loaf.

More step by step fotos and in español: AQUÍ


“The LORD is my strength and my defense; he has become my salvation. He is my God, and I will praise him,my father’s God, and I will exalt him. - Exodus 15:2

Recipes and Tips